Configuring Pavilion
Pavilion is driven largely by configurations. This documentation page covers
the pavilion.yaml file, which sets global pavilion settings, as well as
how configuration directories are arranged and managed.
See Test Format for information on test configurations.
This documentation only covers a few important settings. For a full list
of settings, use the pav show config --template command, which will give
the full docs for each configuration option in the pavilion.yaml file.
Finding the Pavilion.yaml file
Pavilion looks for its main pavilion.yaml config in the following hierarchy
and uses the first one it finds.
The user’s
~/.paviliondirectory.The directory given via the
PAV_CONFIG_DIRenvironment variable.
The pavilion.yaml file can configure additional locations to look for test,
mode, and host configs, as well as plugins using the config_dirs option.
The ~/.pavilion directory is only searched for pavilion.yaml by
default, but searches for other configs there can be turned on in pavilion
.yaml
Config Directories
Each pavilion config directory (Pavilion supports having more than one) can (optionally) have any of the sub-directories shown here.
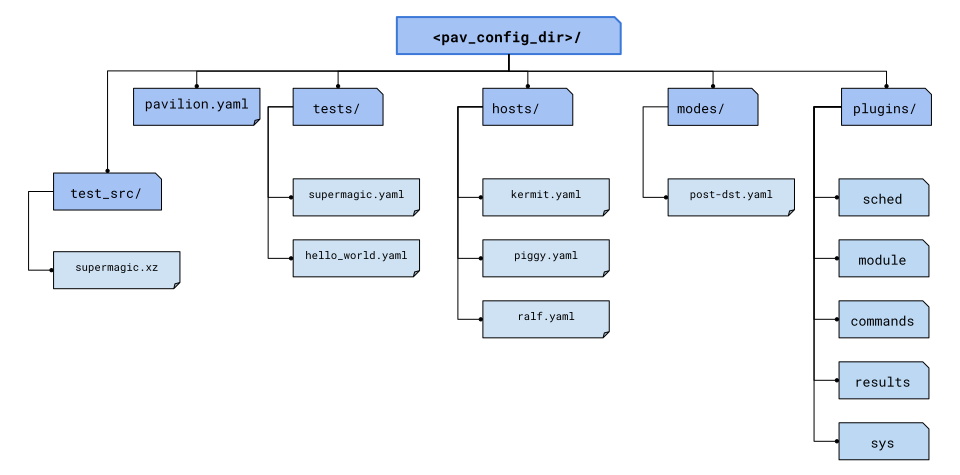
Config Directory Layout
To generate this directory structure and a pavilion.yaml template file, run
pav config setup <config_path> <working_dir>. The <config_path> is where to put the
configuration directory, and the <working_dir> is where to put the working directory that
will hold all of the test builds and run information. We usually deploy Pavilion in a structure
that looks like this:
<some_path>/pavilion
<some_path>/pavilion/src(The Pavilion source checkout)
<some_path>/pavilion/configs(The Pavilion configurations)
<some_path>/pavilion/working_dir(The Pavilion working directory)
Config Generation
As mentioned, Pavilion can have multiple configuration directories. Each of them (other than
the primary one) should have a config.yaml file for settings specific to
that directory. This is created automatically for you if you use the
pav config create <label> <path> command.
This config can also set a distinct working directory and group permissions (this can all be
given as pav config create options). Test runs created from tests in a given config directory
will always be located in its configured working directory and assigned the given group
permissions. Only test run directories are placed in these config specific working directories,
everything else (series, jobs, etc) are always kept in the main working dir.
Writing a Pavilion.yaml
The easiest way to create a new pavilion.yaml is with the aforementioned
pav config setup <path> <working_dir_path> command. This will create the pavilion.yaml
file, if it doesn’t already exist, along with the standard config directory structure.
Setting You Should Set
While everything has a workable default, you’ll probably want to set the following.
working_dir
This determines where your test run information is stored. If you don’t
set this, everyone will have a separate history in
$HOME/.pavilion/working_dir.
result_log
The result log holds all the result json for every test you run. If you want to feed that into splunk, you may want to specify where to write it.
flatten_results
When writing results to the result log, create a separate entry for each
item under the per_file key in results. Each such entry is merged into
base results, and the name of the per_file entry is added under the “file”
key. This is useful for applications like Splunk, which expect
separate log entries for each distinct item.
{"name": "test1", "avg_speed": 32.5,
 per_file: {"node1": {"speed": 32}, "node2": {"speed": 33}}}
This would be logged in the central results log as:
{"name": "test1", "avg_speed": 32.5, "file": "node1", "speed": 32}
{"name": "test1", "avg_speed": 32.5, "file": "node2", "speed": 33}
This does not change how logs are written to the per-test-run results file.
proxies
Pavilion can auto-download and update source for tests, but it needs to be able to get to the internet.
proxies:
    http: myproxy.example.com:8080
    https: myproxy.example.com: 8080

no_proxy:
  - example.com
  - alsolocal.com